Saturday, January 31, 2009

Snoopy Biker Valentine Card

I had a request from a friend to make a Valentine's Day Card for her to give to her husband. He loves his motorcycle so I made this card using my Snoopy stamp.

Photobucket

Snoopy was stamped with black Stazon ink onto Stampin Up Whisper White cardstock. I colored the image using Prismacolor pencils then went over the motorcycle parts with a Versamark pen and heat set clear embossing powder. It makes the bike parts shine like they are clear coated metal. I added a tiny bit of black stickles to the tires.

The inside saying was printed from my computer onto Whisper White cardstock.

Photobucket

I hope she likes it!

Sunday, January 25, 2009

Friend Valentine Card

Can you handle one more card today? This is the last one.... at least for this weekend!

This is a simple card to send to a friend. I'm enjoying playing with this tree stamp. As I said before, I'm also keeping to my New Years Resolution to decorate the inside of my cards. They certainly aren't fancy but they are getting better. At least they coordinate with the front of the card now! LOL

The light pink is a pearlized cardstock. It's hard to photograph. The flash bounces back very strongly, but you get the idea.

Photobucket

The white swirls are rub-ons. The tree was stamped with black Stazon ink then colored in with embossing markers and heat set with clear embossing powder. I added a pink rhinestone to dot the "i" in the word friend.

Photobucket

Oh I also wanted to point out that all the cards I've posted today have been made using supplies from my stash!

Pucker Up Valentine

I'm running out of Valentine inspiration but wanted to get a couple more cards completed. Here is a cute card using a Stampabilities stamp called Love Birds. I added the "Pucker Up" saying from a Studio G set. Inside the sayings are stamps I found at a garage sale. They are unmounted rubber so I don't know who makes them.

The gold swirl background paper is from a pack by Scrapworks called Formal Affair. The hearts on the inside are die cuts using a Cuddle Kid die.

I stamped the birds using Stazon Saddle Brown ink onto Stampin' Up Whisper White cardstock. I colored the birds with Prismacolor pencils.

Photobucket

Photobucket

Saturday, January 24, 2009

Valentine Tree

What a cute little tree stamp! I added the bird to the image. It's from a Studio G set.

Photobucket

Lots of Cuddlebug on this card. The swirls are a Sizzix die that I cut out twice. I used the Swiss Dots embossing folder on the front of the card then cut out the oval hole with a Nestability die. A little bit of Cricut ....the white and red hearts are from the George and Basic Shapes cartridge as well as the tag on the inside.

I stickled the hearts on the tree after coloring them in with Stampin' Up markers.

Photobucket

Frosted Acrylic Card - Beautiful Music

Photobucket

I picked up this stamp at HL's this past week. I thought it was so pretty. I've used it to create this Valentine card on frosted acrylic that I purchased from Sheetload of Cards.

This was a tricky image to color. First I stamped with black Stazon ink onto Stampin' Up Whisper White cardstock. Next I used Prismacolor pencils and outlined the heart in red. I scribbled pink in the center of the heart then used the MCPT to blend the 2 colors into each other. I highlighted the music lines with a burnt yellow pencil. The stamp's picture shows all the splatters of color and to recreate it I put a couple of drops of ink from my Stampin' Up Reinkers into separate wells of a paint palete. Then using a tiny paint brush I dipped it into the ink and tapped the brush to create the splatters. I did this using red, yellow, pink, and green. I also managed to splatter my work surface, my tee shirt, my hands and my wall! But it was worth it! LOL Lastly I inked the edges of the cardstock with yellow and red Colorbox ink.

I stamped the dotted swirls on the acrylic using Stazon Red ink. After I was sure it was dry I added small drops of red stickles to the dots. The music notes and tiny hearts were stamped using Stazon Black ink.

Here is the inside:

Photobucket

The verse was printed onto the cardstock using my computer.

I have been Tagged!

This is such fun! Sandy from Ukiah tagged me. Be sure to check out her blog for a really great picture of her family. When you are tagged you are to go to your pictures and pick the 6th folder and then the 6th picture in that folder. Post it and explain what it is all about. So... here is my 6th/6th pic.....


I organized the baby shower for my DIL when she was expecting my DGD. This shot is of my Mother and Sister during the "Diaper" game. I had taken 8 disposable diapers and put some type of food item inside each one. The ladies had to guess what was in the diaper. Some of them were so funny! If you ever do this game use Italian Salad dressing in one. It has a very odd look to it when poured into a diaper! Everyone totally enjoyed playing.

Now it is my turn to tag 6 well deserving bloggers that I'd love to know better. I've chosen Ted, Ruby, Linda, Pam, Florellis, and Patti.

Friday, January 23, 2009

Bee My Valentine...

I love this little bee and decided to make a Valentine card with him. My Valentine's day cards are not very traditional... I have more fun just getting creative! The bee is stamped using stazon black ink. I colored him in using embossing pens then heat set with clear embossing powder. I used Nestabilities to cut out the oval and scalloped oval.

Photobucket

Valentine Teacher Cards

I've been working on Valentine Cards for Teachers at the request of my co-workers.
This first one is very cute.....

Photobucket

I used the apple from Doodlecharms and in Design Studio placed a heart from George and Basic Shapes in the center of the apple so when it was cut out the apple had a heart shaped hole in it. I also cut out a separate heart that was just a tiny bit larger to place behind the opening. The picture doesn't show it but the white heart is flocked. The leaf is from Walk In My Garden. I outlined the leaf and stem with stickles. The stamp is from a Studio G set.

This next card is my favorite....

Photobucket

I had never made a suspension card before and this one took extra time to figure out the holes but the end result is very cool. The circle words were printed onto the designer paper using my computer and Microsoft Word. The black background is Black Magic cardstock with the blue core. I ran it through my Cuddlebug using the hearts embossing folder then gently sanded the raised portions to allow the blue to show through. The heart is glittered to add "pop" to the design. I think this would be a nice card for a male teacher.

Photobucket

Tuesday, January 13, 2009

Double Flap Belated Birthday Card

I picked up the instructions for making a Double Flap Card from Youtube a while back and decided to give it a try. This is a fun card to make and very simple. I did add a magnetic closure to the card just for fun.


Photobucket

Here is the first flap opened. You can see one side of the magnet on the brown flap.

Photobucket


And the second flap opened. See the other magnet on the purple flap? These are self sticking card magnets. They are very thin and do not add bulk to the card.


Photobucket

Sunday, January 11, 2009

Valentine Treats - Wild About You

In an effort to stay ahead of the holidays I finished the Valentine Treats for my co-workers.

Photobucket

The sour cream containers were made using the directions on splitcoaststampers.com.

Photobucket

Photobucket

To create the tag I cut out the zebras from Animal Kingdom at 2 1/2". I added a blue rhinestone for the zebra's eye. and used pop dots to stick them to the heart. The word "Wild" was cut from Opposites Attract at 1". I welded the letters together in Design Studio. The hearts were cut from George and Basic Shapes at 3". I ran the white heart through my Zyron machine upside down and added Martha Stewart Glitter. The About You words were stamped using a rolling stamp by Etcetera. It is the 12 pt Swell font. The back of the heart has "Happy Valentines Day" stamped on it and I signed my name.

I filled the containers with small conversation heart candies. The tags are tied to the containers with Happy Valentine's Day ribbon threaded through holes punched in the tags and the tops of the containers.

These were very quick to make and a terrific project if you need to make multiples. I made a dozen in 2 days.

Saturday, January 10, 2009

CD Calendar Box Instructions

Photobucket

I received many emails asking for instructions on how to make the box that I created to hold the CD Calendars. The original instructions were given to me by my NSSS Jess-A-Girl. I modified them slightly by adding the decorative border at the top. The instructions are a .pdf file (you will need Adobe Reader to view it) Click HERE to open the file. You are welcome to save a copy to your computer or print it off for your own personal use.

If you try my instructions and they work for you please leave me a comment.

Sunday, January 4, 2009

St. Patrick's Day Duck!


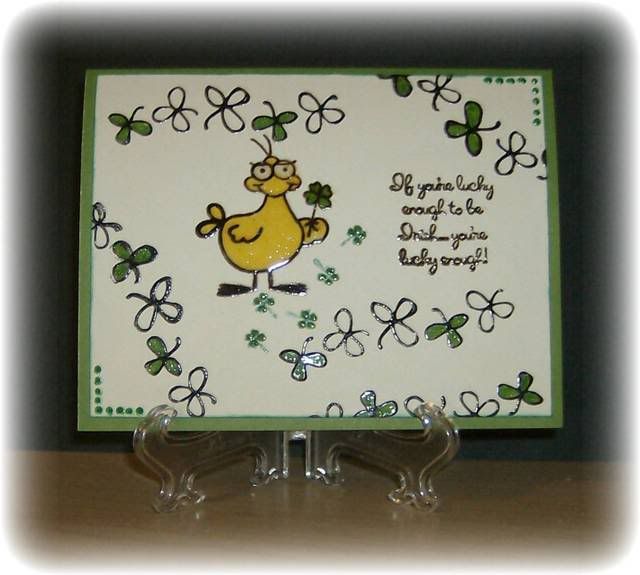
I got in a really silly mood yesterday while organizing my clear stamps. I saw this duck and since I had just finished putting away my St. Pat's day stamps I put 2 + 2 together and decided he would make a fantastically silly St. Patrick's day card. I crack up every time I look at him. His expression and those glasses....LOL Anyway, the duck is from an Inkadinkado mini stamp set. The sentiment is a Studio G set (#26). The large shamrocks are a $1 stamp I found at Joann's.

I did this card almost entirely with clear embossing powder. I stamped the duck using Colorbox black pigment ink and heat set with clear embossing powder. I colored him in using a yellow embossing pen and sprinkled clear embossing powder over the duck again. Heated it up and quickly sprinkled the embossing powder one more time. When it was heated and cooled he has a very thick, shinny, yellow color. It almost looks like plastic.

I stamped the shamrocks with the Colorbox black pigment ink and heat set clear embossing powder over them also. I colored a few shamrocks in using a green embossing pen and guess what....more clear embossing!

Lastly I stamped the sentiment and embossed that too! My poor heat gun really got a workout on this card!

I added green Liquid Pearl drops to the corners to finish it off. Doesn't this duck just make you smile?

My New Years Resolution is to decorate the inside of my cards also. I have a lot to learn about doing the inside, but I'm trying!


Saturday, January 3, 2009

Overcoming frustrations

I sat down last night to create a masculine Valentines card. Well, as most of you know "the best laid plans....." It was one frustration after another. I ended up with a nice FATHER'S DAY card! Thought I would share how this came to be. (This is a long story since I'm adding all the exact dimensions that I used.)

I picked out a very nice green patterned paper from a 6x6 paper pad made by Basic Grey called Boxer. Then I found matching ivory and green cardstock. So far so good right? I stamped the deer on the ivory cardstock using Stampin' Up's Chocolate Chip ink. Cut out the stamped image with an oval Nestability. I also cut out a scalloped oval from the green cardstock using another Nestability in a size slightly larger. Next I cut down the green cardstock and folded it in half to make the 4 1/4" x 5 1/2" card base. I cut an ivory mat at 4" x 5 1/4" and cut the patterned paper at 3 3/4" x 5". Now I was ready to add the "extra" touches.

Using Colorbox Hunter Green pigment ink I bounced the ink on the edges of the ivory oval. The ink was very wet and even though I thought it was dry I smear it! So I start over and create another stamped oval. Once again I bounce the ink on the edges and guess what? SMEARED it again!!!! So for the 3rd time I create a stamped oval. I bounced the ink on the edges and quickly sprinkled on clear embossing powder and heat set it. Now it can't smear! As I looked at the result I liked what I saw. The shine gave another dimension to the oval. Hey, why not do the same thing to the scalloped circle? I tried it and really like how it turned out.

So now I'm thinking why not try this on the ivory cardstock mat. It looked really nice! I found some matching ribbon in my stash and 3 dark brads and put the card together. I cut an ivory cardstock piece to fit the inside of the card and added a strip of the leftover patterned paper.

Now it's time to add the sentiment. I tried writing my own verse.... no good! I surfed the net for 3 hours! NOTHING... I was so frustrated I put it aside and went to bed. When I got up this morning I looked at the card again and it hit me.....This is a terrific Father's Day card! So I was reminded again that my mistakes can sometimes create something new and unique and to stop fussing with something and GO TO BED!

Here is the final result. I really like the embossed edges do you?

Photobucket

Photobucket

Thursday, January 1, 2009

I won an Award!


I'm so excited to share with you the award that Sandy from Ukiah gave to me. What a great way to start the new year! Be sure to visit her blog! Thank you Sandy for making this a terrific day!
The rules say I need to list 5 addictions and 5 of my favorite blogs.
Addictions:
Versamark/embossing: I can't seem to create anything without using it at least once on a card or layout.
Ribbon: You can never have enough ribbon.
Cricut Cartridges: I NEED them all!
Cardstock: I'm working on having every color in the rainbow.
Stamps: Once you start collecting you are hooked.
My 5 favorite blogs: This is a tough one because there are so many terrific and tallented people out there. Here are my top 5:
Okieladybug's Scrap N More: Okie is so generous sharing her cut files and she is always open to answering my questions.
Tedology's Craft Blog: Ted is a talented man that takes the time to teach us how to use the cricut message board. He creates some great works of art.
Julie's Crafty Corner: This lady is so talented! I love looking at her cards.
Dzyner's Showcase With A Twist: If you haven't visited her blog you should! She comes up with the most amazing designs!
BCR8IV: Michelle has some fabulous cards made using the cricut. This is a great blog for any cricut lover.


1st card for 2009!


My first card of the new year! I created this clear card (which is a bugger to photograph) using clear acetate from Sheetloads. I cut an 8 1/2 x 11 sheet in half to give me a 4 1/4" x 5 1/2" card.

The flowers are stamped on the outside using Stazon White ink. The stamp is called Modesty by Penny Black. I stamped it once on the right then turned it and stamped again on the left.

The inside cardstock is from the Martha Stewart Golden Woodland paper pad. I used my computer to print the sentiment onto the cardstock before I cut it to size. The circles on the pattern were highlighted with a VersaMarker pen then heat embossed with Antique Gold embossing powder. (It doesn't show up well in the photo.) I edged the cardstock with an 18K gold leafing pen.

On the inside the bird stamp is from an Inkadinkado set called Birds Galore. I stamped the bird first with Stampin' Up's Chocolate Chip ink then again on top of the image with versamark and heat set clear embossing powder. This gave my bird a nice shine.

I added a blue rhinestone for the bird's eye and for the dots after the words. I also put a couple of rhinestones on the front of the card to highlight a few of the flowers.

The ribbon is Stampin' Up's Not Quite Navy.

Photobucket
I think this is a simple card with a big impact! What do you think?