Tuesday, October 6, 2009

Lizard Birthday Card

Lizard

My Son's birthday is coming soon and since I have a hard time designing cards for guys I figured I better get started early.  This simple card came together pretty easy since my friend contributed the burgandy cardstock and the ribbon.  I found the patterned paper at a garage sale this past weekend.  The circles have a glossy shine to them so I stamped and embossed the lizard to coordinate with the paper.  After I took this picture I went back and colored in the stars and eyes on the lizard with a gold sparkle gel pen.  Since I wanted to tease my son about getting older the inside says "You may be old, but you're not extinct!".  He will love that!

Monday, October 5, 2009

Lil Lady Card

Lil Lady
I spent Saturday evening scrapin with a friend until the wee hours of the morning!  We had a blast and around midnight we decide to have a contest.  We pulled out 2 sheets of purple cardstock, 1 sheet of Very Vanilla, a 2003 stamp set called Cute as a bug (Stampin Up) and said we each had to make a card using one of the images from this set and could only use the 2 purple cardstocks.  Anything else in my scrap room was ok to use. We sure did a lot of giggling!  But here is my final card.  Give this a try next time you get together with friends.  It made a great ending to our evening. That and all the chocolate we were eating!  LOL

Sunday, October 4, 2009

Birthday Dress Card

Dress

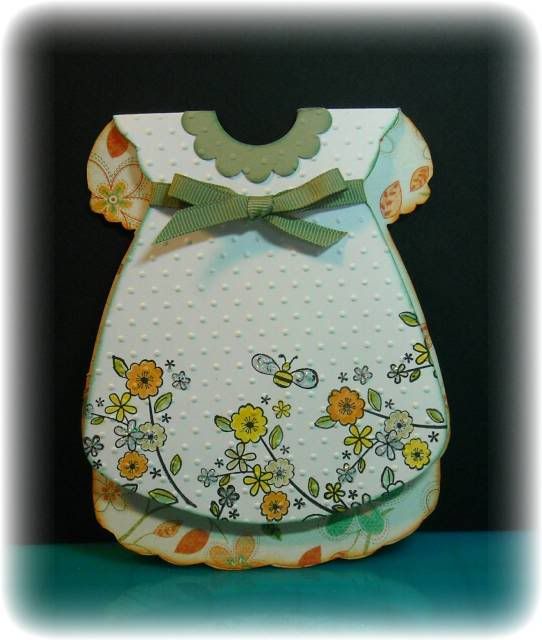
I created this dress card for my DGD's 2nd birthday.  I found the template here.  The steps I used to make the card are:
1. Print the template onto cardstock of your choice.  For mine I used Stampin Up's Whisper White.
2. Cut out the template.
3. Lay the template on top of patterned paper so that the shoulder fold is at the edge of the paper.  Trace around the template on to the patterned paper.  You are only going to trace the large (back) side of the dress.
4. Stamp your images onto the front side of the card.  Color in as you wish. I used an aqua brush and Stampin Up inks.
5. Cuddlebug the card.  I used the swiss dots folder.  It took 3 passes to do both the front and back.
6. Score and fold the dress.
7. I used a 1" circle punch to create the neck opening. Put your punch 1/2 way over the fold to create a 1/2 circle on the front and a 1/2 circle on the back.
8. Punch a 1" circle into a scrap of cardstock to begin to create the collar.  Use a scalloped circle punch centered over the 1" hole and punch out.  (I ran mine through the Cuddle Bug before glueing it down) Cut this in 1/2 and glue 1/2 to the front around the neck opening and the other 1/2 to the back.  I found this worked better than just folding the scalloped circle and gluing it down.  When I did that and opened the card the collar popped off.
9. Glue the patterned paper inside the dress.  Trim with an Xacto knife if necessary to get a clean fit.
10. Ink all your edges.
11. Add ribbon and any other embellishments you want.  I added stickles to the bee's wings and some of the flowers.
Now you have a darling little dress card!

Thursday, October 1, 2009

Birthday Shoe

Birthday Shoe
A quick birthday card for you tonight.  I used the shoe from my Happily Ever After cartridge and Design Studio to create the card.  All the pieces were cut at 5 1/4".  I had the paper and ribbon in my stash and thought they would make a cute shoe.  The shoe looked very plain so I added the ribbon and buckle.  I think it addes a nice finishing touch.  The edges of the patterned paper were inked with Walnut Stain Destress Ink.  Glossy Accents worked great to adhere the bow to the paper. 

Photobucket

The inside verse was computer generated.  I used one of the negative images to trace around the words and then cut it out to fit the inside of the shoe.  The one bad thing about this card is that it does not stand up.  If you look at the shape of the shoe it is goofy.  Next time I make this I'll try and alter the shape.